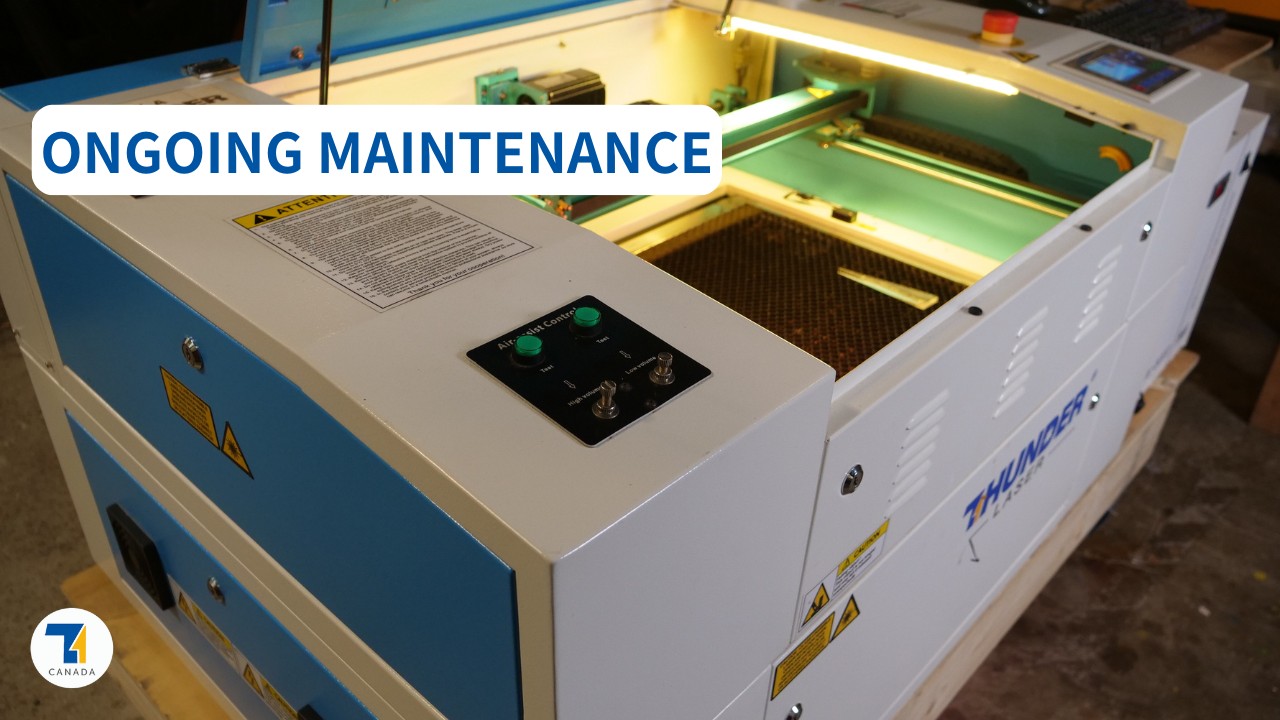
Like any tool, your laser cutter will need to be maintained – and due to the nature of the work the laser is doing, there are a few specific jobs that need to be done often, while others aren’t as urgent.
Below are just some of the things to remember when cleaning your laser, and when you should think about doing them. For more info and detailed guides, check out the additional resources article below
Keeping your laser in top shape doesn’t have to be a chore. In fact, with a little bit of routine care, you can make sure your laser remains as reliable and powerful as the day you first turned it on. Whether you’re using it for precise cutting, engraving, or any other creative project, regular maintenance is key to its longevity and performance.
To make things easier, we’ve broken down the essential upkeep tasks into three simple checklists: Daily, Weekly, and Monthly. Each list is designed to guide you through quick, straightforward steps that will help you avoid common issues and keep your laser operating at its best.
So grab your favorite coffee, and let’s dive into these easy-to-follow routines. With just a bit of attention, your laser will continue to shine bright and deliver outstanding results for all your projects! Don’t take our word for it. Look how much fun our ambassadors over at Brotherwood Woodcraft are having.
Daily Laser Maintenance
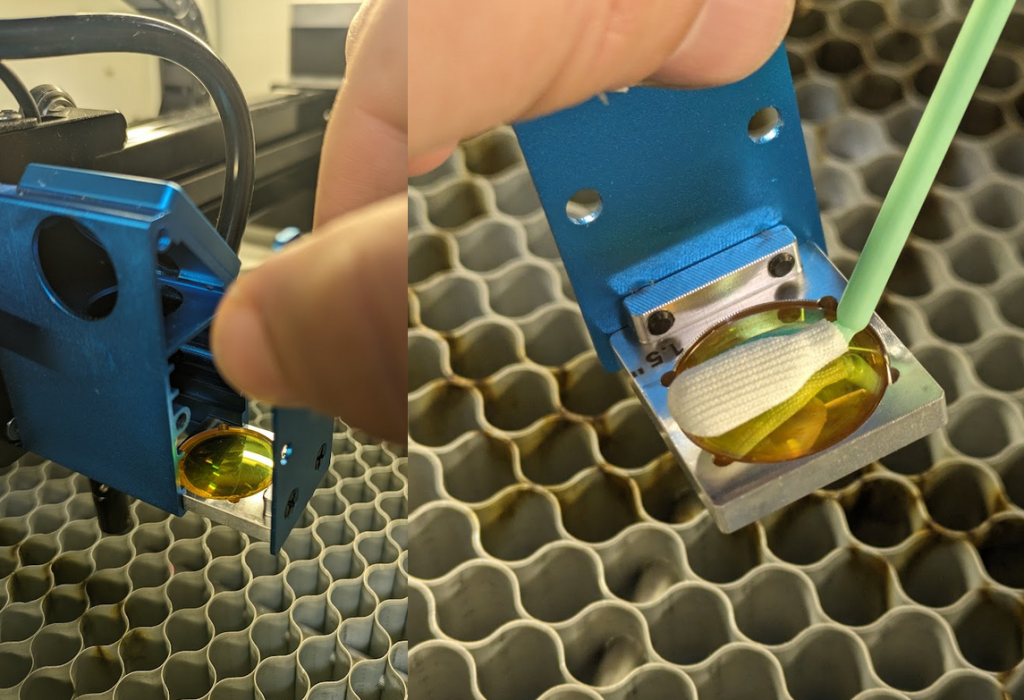
Cleaning the Focal Lens
Every time you use your laser, clean your lens and mirrors first – just in case any dust or debris settled on them.
You should wipe down your lenses and inside of your machine after every few cuts to ensure your lines and engraves turn out clean and focused. If dust and debris build up on the lens, it will not only obstruct the beam, it can cause the lens to overheat and eventually crack.
We recommend using a cloth meant for camera lenses (not an eyeglass cloth) with a 90% alcohol
Click the following links below to learn more about this process and why it’s important to maintain the optical path of your laser:
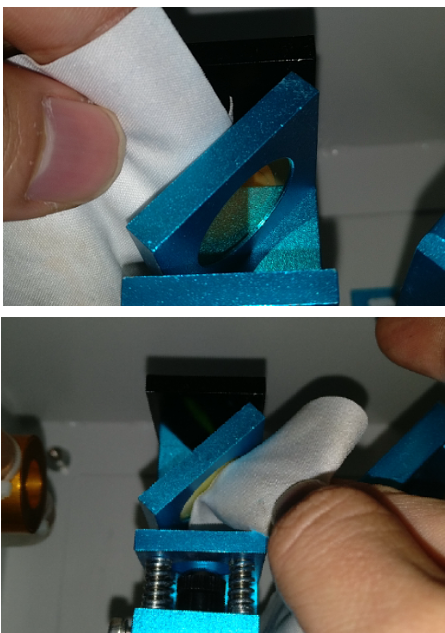
Like the focal lens, you also want to ensure that your mirrors are properly cleaned. When mirrors are clean, they reflect the laser beam with full strength to the next mirror or lens, ensuring that your cuts and engravings are sharp and accurate.
If the beam is even slightly dirty, it could cause a misaligned beam – which is the cause of uneven cuts and reduce the quality of your engravings over the span of your workbed. You do not need to remove your mirrors to clean them.
Just like cleaning your lens, we recommend using an alcohol 90%+ solution to gently swab your mirror in a clockwise motion. Then do another wipe, this time with a dry cloth (again, meant for camera lenses) to remove any remaining residue.
Weekly Maintenance
Cleaning The Nozzle
Over time, you’ll begin to notice scoring and residue build-up on your laser nozzle. This should be cleaned off to prevent it from obscuring the laser path, or falling/dragging on your work and leaving a mess.
Remove the air assist hose and unscrew the nozzle from its housing to properly clean. Use a bit of alcohol cleaner and a wipe to remove any residue before reinstalling.
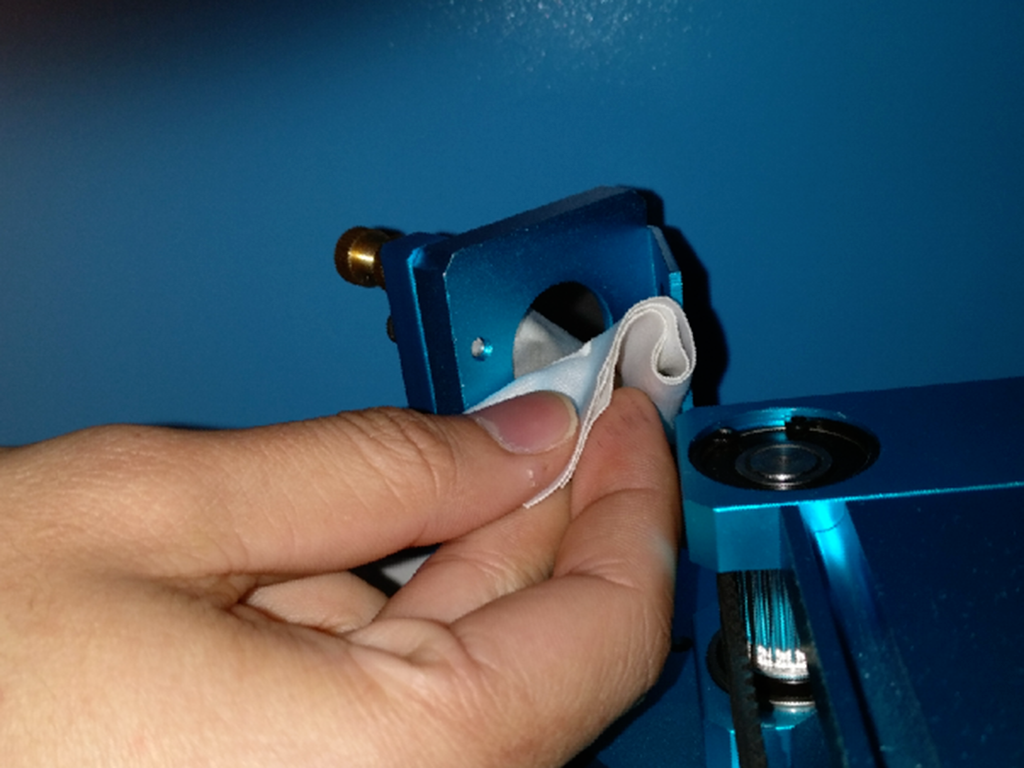
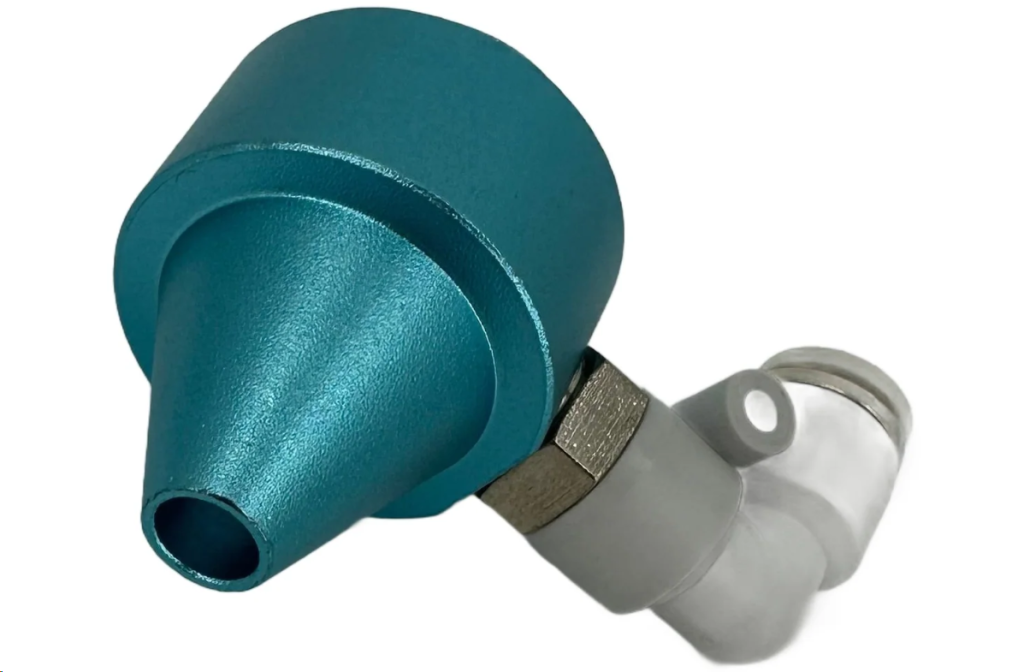
Cleaning The Beam Combiner
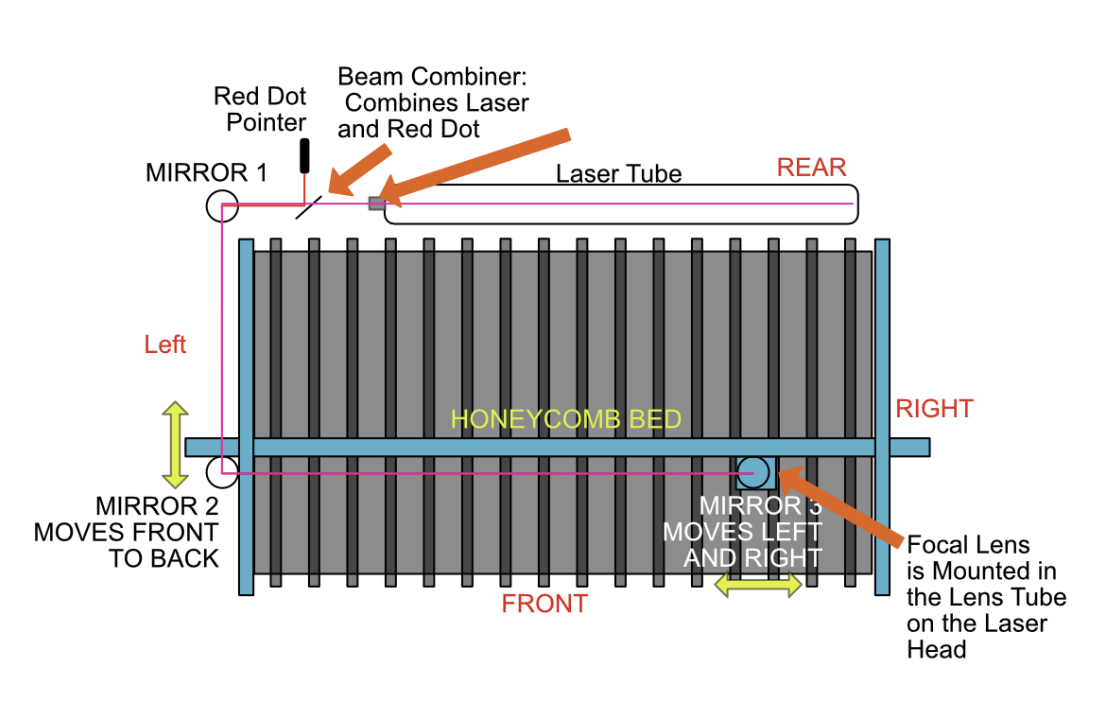
The Beam Combiner is the special lens next to the laser tube at a 45 degree angle. This lens combines the laser beam with the red dot pointer, allowing you to see where the laser will hit your material.
Like the lenses and mirror, carefully clean both sides of this lens in the same manner as a lens cleaning – dabbing both sides with a moist q-tip of cleaning wipe in a circular motion, and then again with a dry wipe to remove any excess liquid residue.
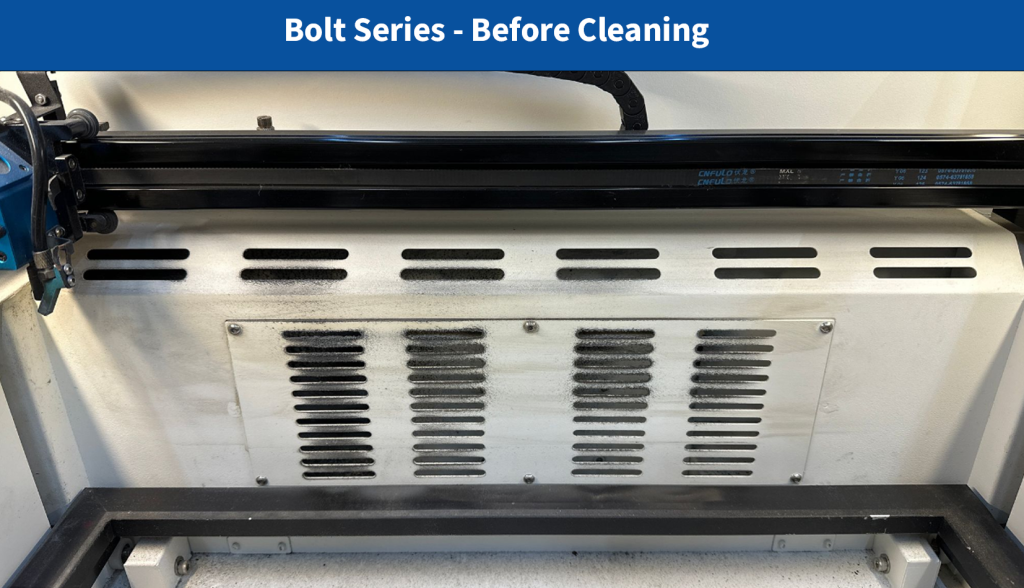
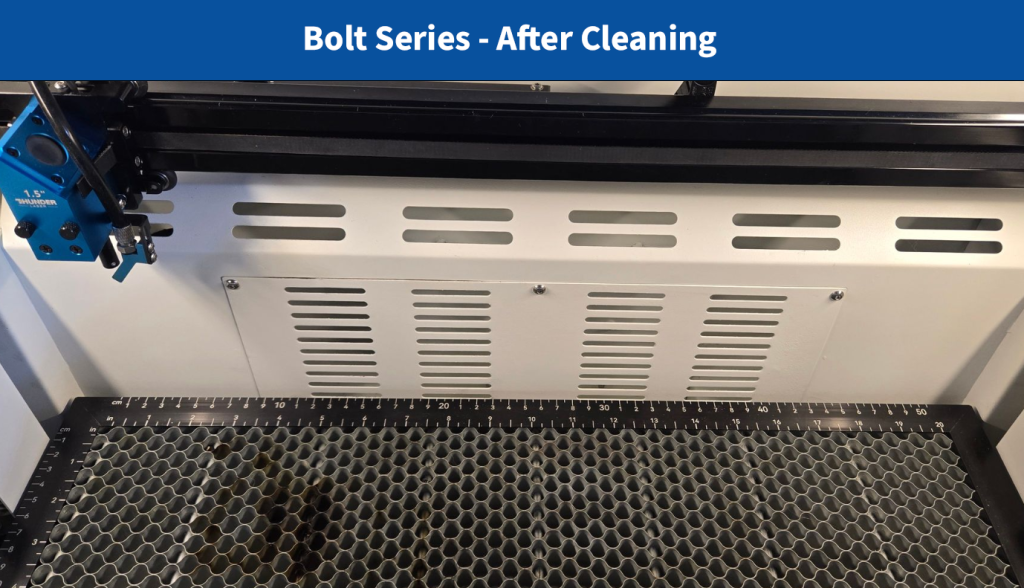
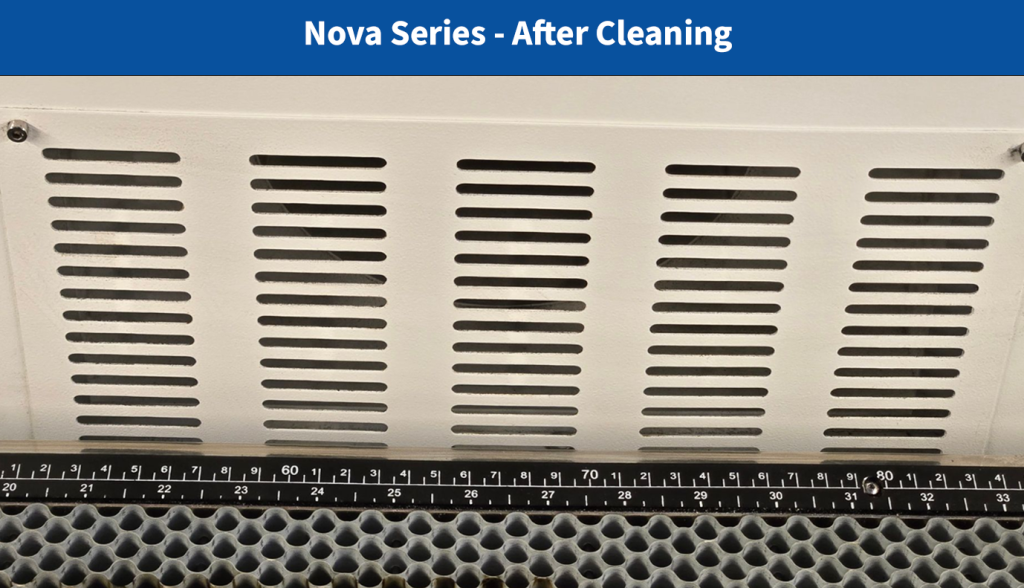
Cleaning The Vents
Occasionally, the vents leading to the exhaust fan can become blocked by debris, residue, and grime. Make sure they’re kept clean so the smoke can be exhausted efficiently.
You can use the same cleaner you use for the inside of your machine to clean the vent (we use a degreaser with paper towels). If you have a shop vacuum handy, you can use this to clean the vent and remove debris from the other side as well
This is also a good time to mention to clean the inside of your machine as well. Build up of smoke can lead to browning and discoloring of your laser machine over time. We recommend to give the inside of your laser a quick wipedown once a week to keep it clean and sparkling
Monthly Maintenance
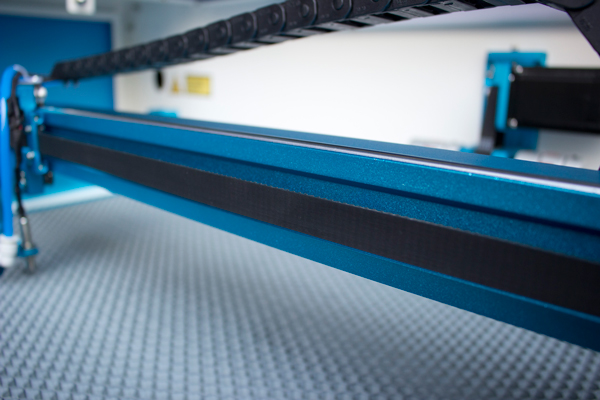
Cleaning the Belts
In your laser, the belts are responsible for the smooth and swift movement of the laser head around the workbed. If the belts get dirty, dust, debris, or residue can cause them to slip or lose tension, leading to inaccurate cuts and engravings. A dirty belt can also wear out faster, leading to more frequent replacements.
The belts can easily be cleaned with a microfibre cloth and gently rubbing the underside of each belt.
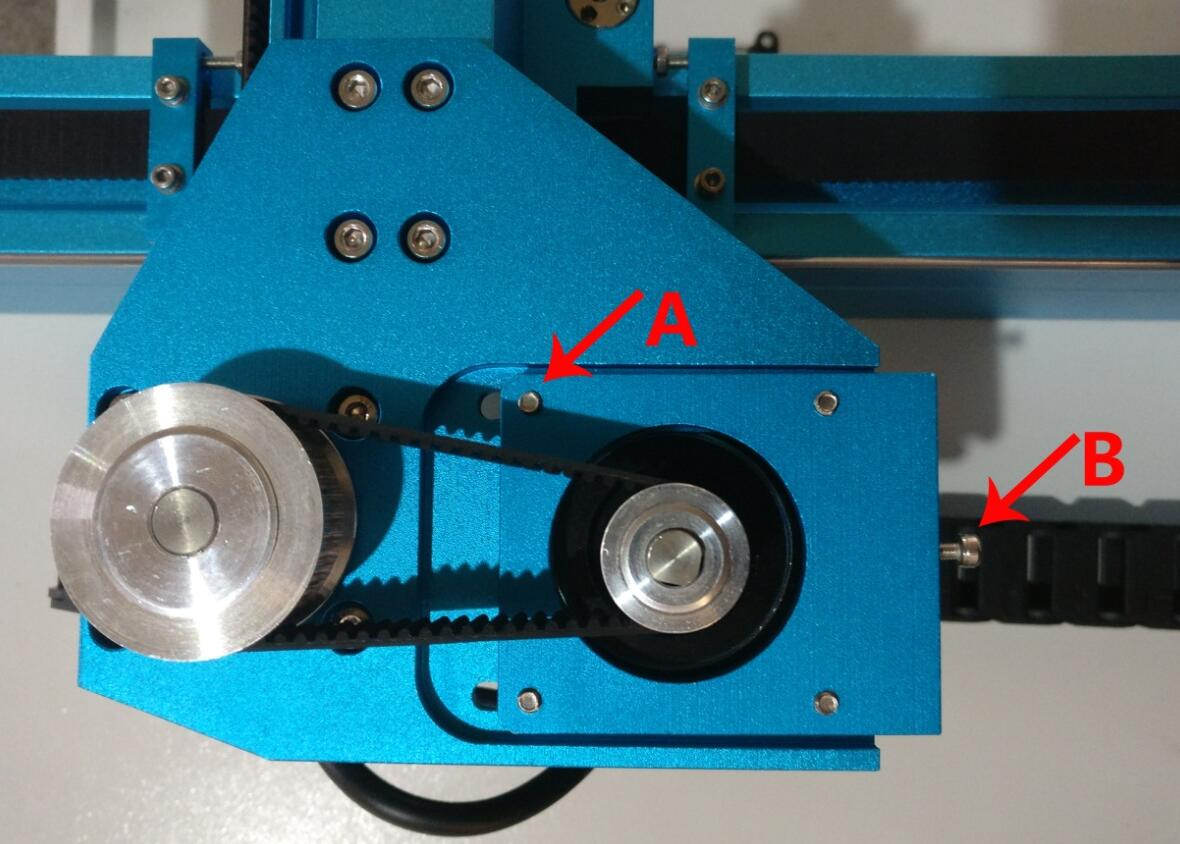
If you’ve let this go for longer than a month, you might also want to check the teeth of the gears (and belt as well) for any entrenched debris.
On Nova Machines, pay particular attention to the X Axis belt tucked away on the right side of your machine. If you begin to hear the laser squeaking as it moves along the x axis, you’ll need to clean the belt and teeth of the gears in this assembly.
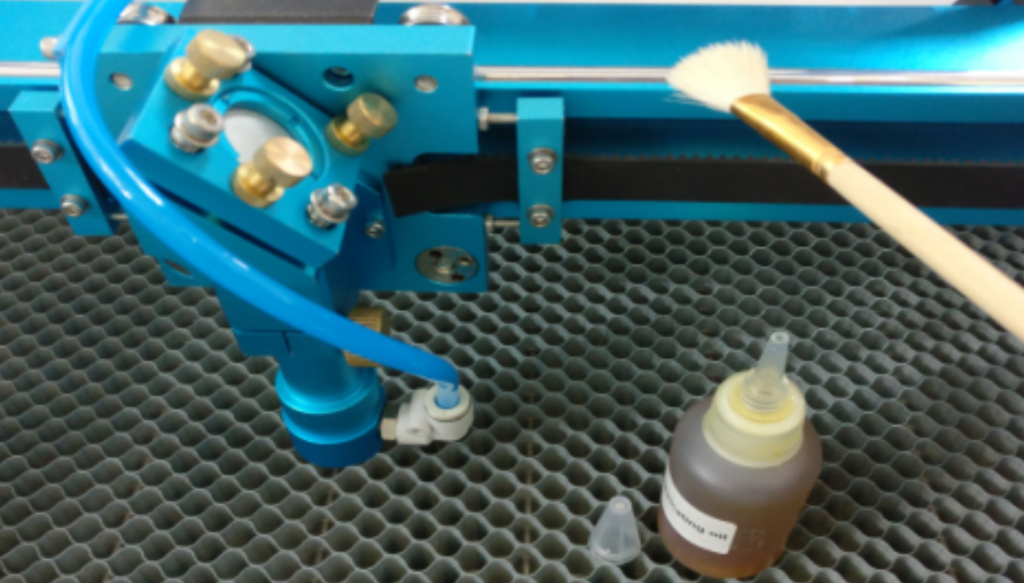
Oilling the Bearings and Rails
Like the Belts, the Rails are also essential in the smooth movement of your machine. In your toolkit, you will find a bottle of lubricating oil.
With a cotton swab, or paint brush, place a few drops on your tool and run it up and down the steel rails on the left and right of the workbed, as well as along the x axis gantry.
You can also add a few drops to each of the bearings on the laser head, and with the machine powered off, move the head left and right to ensure proper coverage.
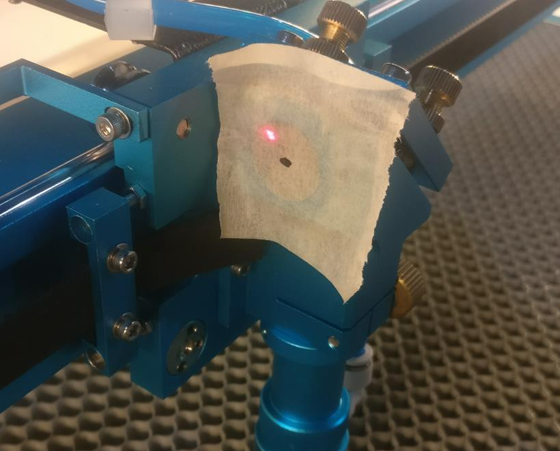
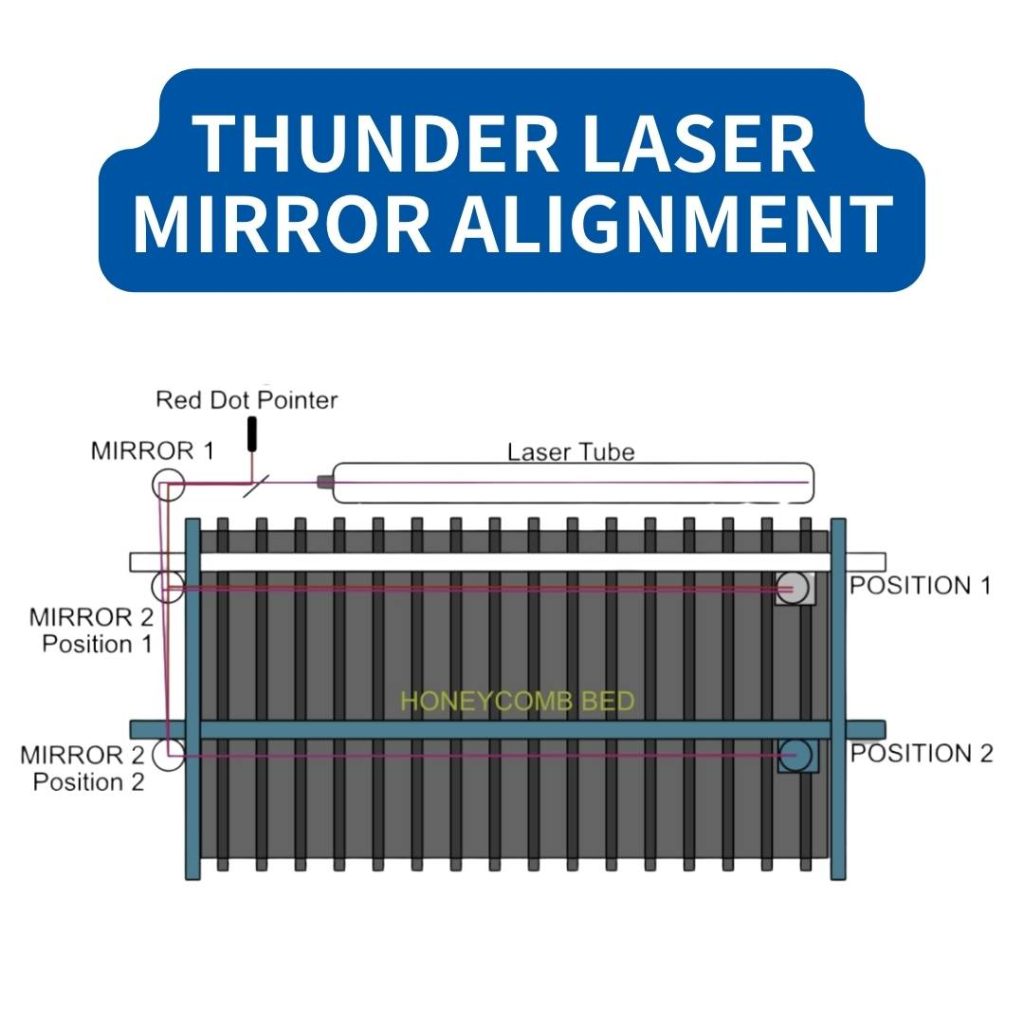
Checking the Beam Path
Also commonly known as a ‘Mirror Alignment’, this is a check to ensure that your laser is hitting the center in the same spot on all of your mirrors.
You can read all about this process in our helpful guideHERE
To check, simply use a piece of masking tape, and press it over the circular opening in front of each mirror, and pulse your laser.
On Nova Models, use the PULSE button on the front of your controller.
On Bolt Models, on your touch screen press MENU → ALIGNMENT and this will bring you to the diagnostic screen.
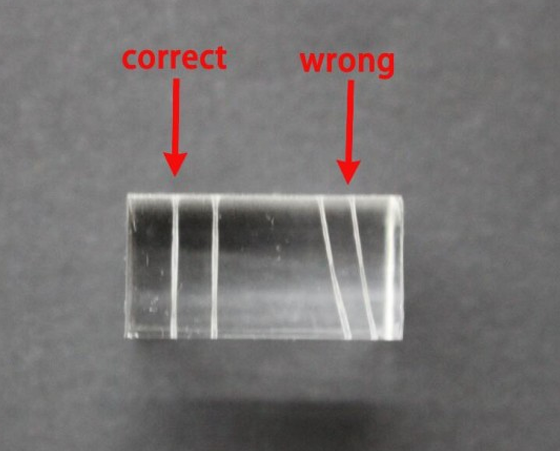
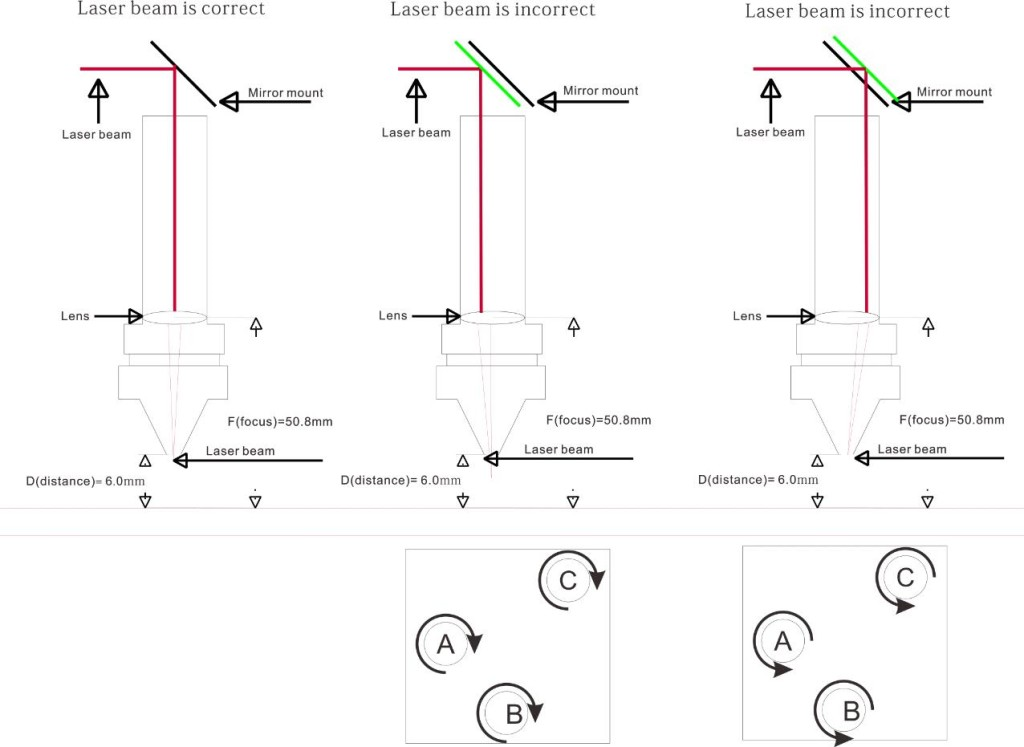
Mirror 3 is the most important of the mirrors when checking the alignment. If the laser doesn’t hit the center of this mirror perfectly at 45 degrees, you can see from our diagram to the left how this can affect the angle of the laser when it leaves the laser. The resulting beam won’t be 90 degrees, and will cause your cuts to be skewed (if able to cut through at all).
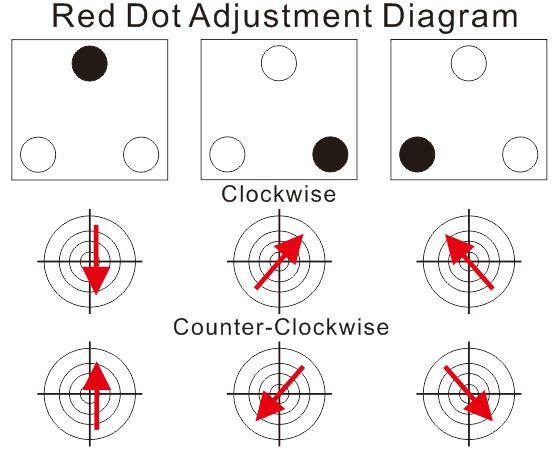
If your mirror need adjusting, the three thumbscrews on the back of each mirror will dictate a particular angular movement of the mirror, as depicted to the left
NOTE: This MAY take some time, be patient, and as always, contact us if you need any assistance or guidancesupport@thunderlaser.ca
Seasonal or Quarterly Maintenance
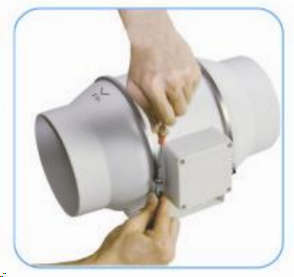
Cleaning the Exhaust Fan
As with other areas that build up grime and residue over time, the exhaust fan is another item that builds up that most users don’t think about.
Cleaning the fan every 3 – 6 months is a good way to ensure you machine is venting your exhaust efficiently.
In order to clean your fan, unscrew the metal bands on either side of the middle chamber. Slider the middle section out, and clean with degreaser and rags. Clean and dry before reinstalling the section back into your fan
Remember to reinstall it in the proper direction. the little arrow will point in the direction of airflow
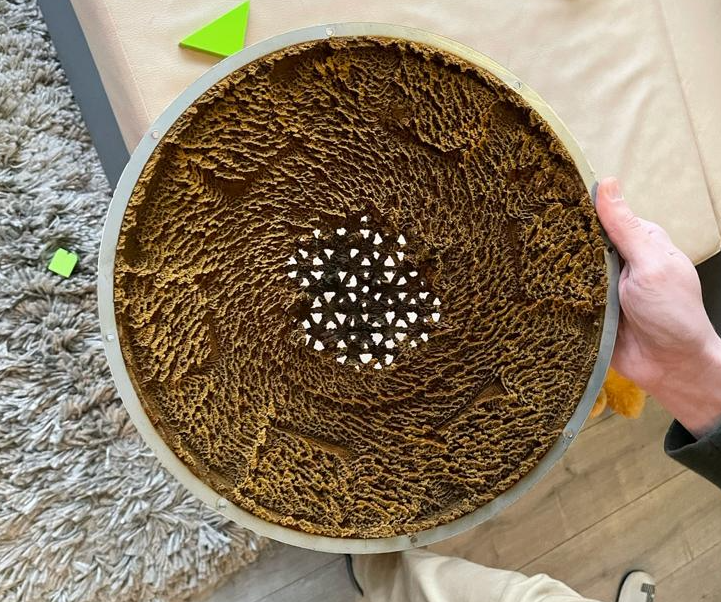
Cleaning the Honeycomb Bed
A dirty honeycomb bed is likely to trap debris, residue, and smoke, which can affect the quality of your cuts and engravings. Over time, this buildup can cause the material you’re cutting to not sit flat, and even stain the underside of your materials.
To prevent this, you can simply remove the honeycomb bed, and spray it with any foaming degreaser or oven cleaner you can find at your local hardware store.
Let it sit for 15 minutes, and then spray the bed down and leave it to dry before reinserting it back into the machine.
Chiller Refill (Nova Series)
For our machines equipped with a water chiller, we recommend draining your chiller and filling it with fresh distilled water every 3-6 months to prevent algae growth.
Remember, if your laser is in an area where it can potentially reach freezing temperatures in the winter, you’ll need to winterize your chiller.


.png "laser cutter Globle")


